Lesson 1 · Meet the XRP
Lesson 1 · Meet the XRP
Teacher mode is on. Gray boxes and this banner are visible only to you. Toggle it off (switch in the corner) to preview the student view.
Today you'll meet your robot, learn what each part does, and write your very first program to make it drive. By the end you'll have code running on real hardware — no experience required.
Learning Objectives
By the end of this lesson you will be able to:
- Identify the key hardware parts of the XRP robot and say what each one does
- Find your way around the XRP Code (Blockly) programming environment
- Write, upload, and run a block program that drives the robot forward and backward
- Debug the most common first-day problems
The parts of the robot
Before we program the XRP, let's see what we're working with. Every part has one job, and knowing them makes debugging much easier later.
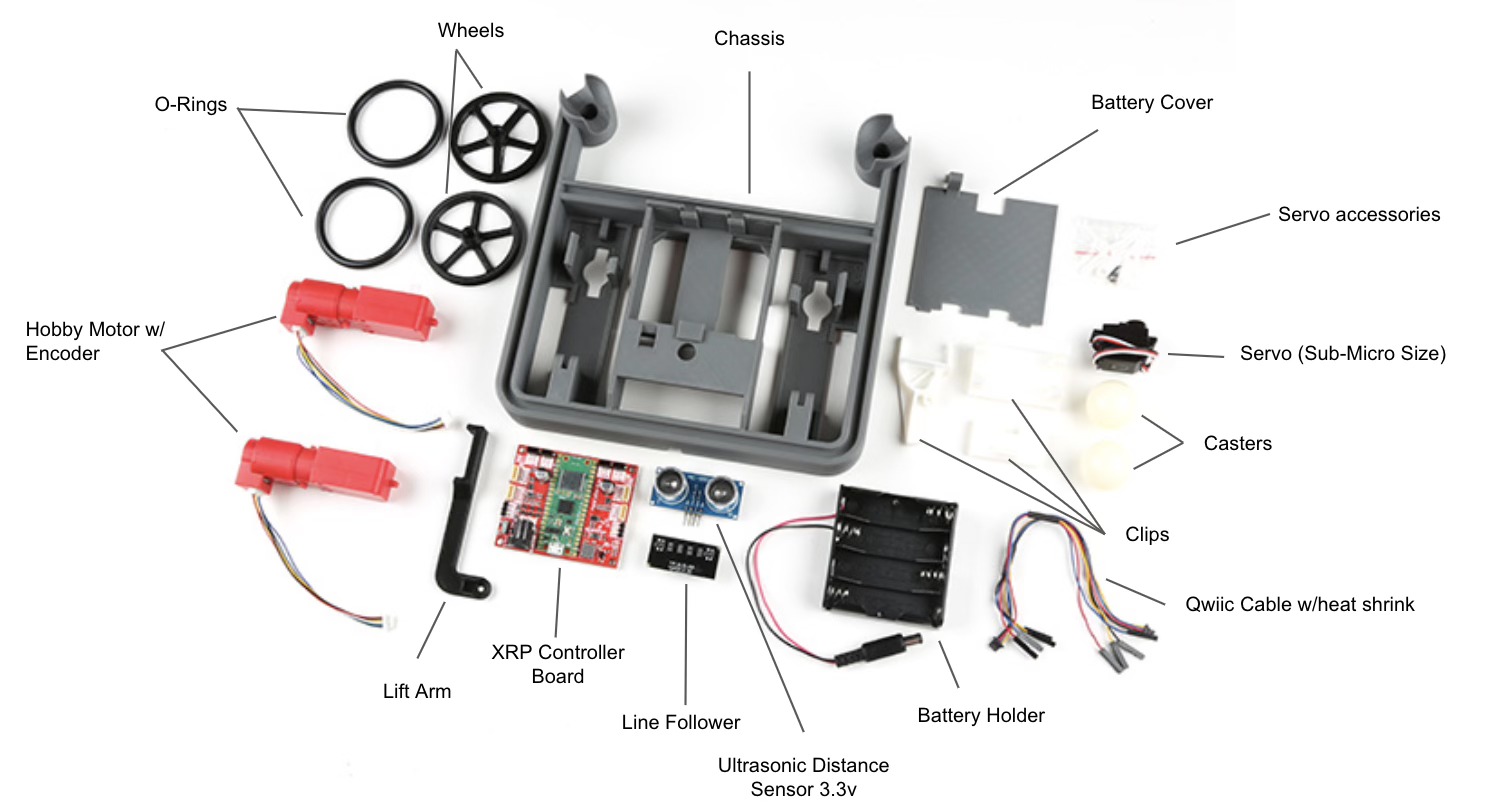
- Wheels & motors — Two motors, one per side. Each motor spins one wheel. Because the sides move independently, the robot can steer.
- Controller board — The robot's "brain." It receives your program over USB and tells the motors what to do.
- Battery — Powers everything. A low battery makes the robot sluggish.
- Sensors — Reflectance sensors (see light vs. dark — labeled Line Follower in the diagram) and an ultrasonic rangefinder (measures distance). You'll use these in later modules.
- Caster wheel — The little rear wheel that keeps the robot balanced.
Why does the XRP have two motors instead of just one?
Which part is the 'brain' that runs your program and tells the motors what to do?
How the robot gets instructions
A robot only does what you tell it. The workflow is always the same:
- Write a program (we'll use Blockly).
- Connect your computer to the robot — by USB cable or over Bluetooth.
- Upload the program to the robot.
- The robot runs the program — each command in order.
Step 3 matters: writing a program isn't enough. It has to be uploaded before the robot can run it.
Two ways to connect
USB cable. Plug the robot into your computer. This is how you'll connect today, and it's the connection every robot needs the first time — XRP Code uses it to install and update the software that lives on the robot.
Bluetooth. Once a robot has been set up over USB, XRP Code can reach it wirelessly. Unplug the cable, turn the robot on, click CONNECT, choose Bluetooth, and pick your robot from the list. Everything works exactly as it does over USB — you're just not tethered to the table anymore, which matters a lot once the robot is driving around the floor.
Every XRP has its own ID, shown under the RUN button while it's connected. Write yours on the robot so you can pick it out of the list — and don't pair with somebody else's robot.
Your robot is brand new. Why can't you just connect to it over Bluetooth right away?
Your first program in XRP Code
XRP Code runs in a web browser — there's nothing to install and nothing to log into. Open xrpcode.wpi.edu/staging and you're at the place where you'll build programs by dragging blocks.
Use Google Chrome or Microsoft Edge. This isn't a preference — talking to the robot needs browser features for serial and Bluetooth connections that only those browsers support. Safari and Firefox will load the page and let you build a program, then leave you stuck at the point where you try to connect: your robot never appears in the list. If you hit that, switch browsers before you troubleshoot anything else.
The XRP User Guide has a whole chapter on XRP Code — a tour of the three panels, connecting over USB step by step, and a troubleshooting section for when a robot won't show up. Keep that chapter open in a tab; this lesson covers just enough to get your first program running.
A classmate built a program in XRP Code on Safari, but when they click CONNECT their robot never appears in the list. What is the most likely reason?
A few blocks do everything you need today. Drag them out of the block palette:
- The Wait for button press block
 goes
at the very top. A program starts running the moment it's uploaded — this block
makes the robot sit still until you press its button, so it doesn't drive off
the table while you're still holding it.
goes
at the very top. A program starts running the moment it's uploaded — this block
makes the robot sit still until you press its button, so it doesn't drive off
the table while you're still holding it. - The Straight block
 drives in a straight line.
cm is how far to go — a negative number drives backward — and Effort
is how hard the motors push, from
drives in a straight line.
cm is how far to go — a negative number drives backward — and Effort
is how hard the motors push, from 0to1(0.5is a good starting speed). - The Turn block
 turns the robot in place. Deg is
the angle (
turns the robot in place. Deg is
the angle (90is a quarter turn); Effort works the same way.
You don't need a block to stop at the end — when the program finishes, the robot stops the motors for you.
Here's the program we'll build together — wait for the button, drive forward, then come back. Set the second Straight block's cm to a negative number so the robot reverses:
← forward — cm: 20, Effort: 0.5← back — change cm to -20Before you run it, predict: What will the robot do? Will it end up where it started?
You place two Straight blocks one above the other. When you run the program, what happens?
Activity · Upload and run it
Follow these steps:
- Create a new project called Lesson_1_First_Drive.
- Build the forward/backward program from above.
- Connect the robot: plug in the USB cable (use the cable today — your robot needs one USB connection before it can go wireless).
- Click Upload and choose your robot from the list.
- Wait for "Upload Successful," set the robot on the floor, then press the button on the robot — your Wait for button press block releases the program and it runs.
You've succeeded when:
- The program uploads without errors
- The robot drives forward about 20 cm
- The robot drives back about 20 cm
- It stops near where it started
If something goes wrong
- Robot won't move — check the battery is charged and the USB is seated, then re-upload.
- Drives the wrong way — motor directions can be reversed; that's normal and fixable later.
- Not exactly the distance you set — floor friction and battery level affect distance. Close is fine for now.
- Robot not in the upload list — try another USB port or cable (some cables are charge-only), then reload the page.
- Robot doesn't appear over Bluetooth — charge the battery first (a low battery stops Bluetooth before anything else), press the robot's reset button so it isn't busy running a program, and make sure you're in Chrome or Edge. Still stuck? Plug in the cable and keep going.
Activity · Make it your own
Now experiment. Try these in order:
- Go farther — change the cm on both Straight blocks to
30and re-run. - Change the effort — try
0.3, then0.8. What changes: how far the robot goes, how fast it gets there, or both? Measure before you decide. - Add a turn — drop a Turn block between the two
Straight blocks. What shape does the path make now?
- Challenge — can you make the robot drive a square and end up back where it started? No hints: try something, run it, watch, adjust. (Lesson 2 picks up right here, so whatever you figure out now is a head start.)
Real-world connections
The same ideas you just used run much bigger machines:
Delivery robots
Differential-drive robots shuttle shelves around fulfillment centers — same two-motor steering as your XRP.
Robot vacuums
They drive, turn, and sense obstacles using exactly the sequence-of-commands idea from this lesson.
Planetary rovers
Rovers upload a program, then run it on their own — because they're too far away to control live.
Wrap-up
Quick recap — answer these in your head or with a partner:
- What are the main parts of the robot, and what does each do?
- What does a block program actually do?
- How does a program get from your screen onto the robot?
True or false: you can run a program on the robot without uploading it.
True or false: the reflectance sensors detect color.
Resources
- XRP Code IDE — Chrome or Edge only
- XRP Code, in the XRP User Guide — the full tour, connecting, and troubleshooting
- XRP Robot User Guide
- XRP Support Forum