Module Overview · The Robot Starts to Sense
The Robot Starts to Sense
Teacher mode is on — the gray boxes are yours only. Flip the switch (bottom-right) to preview the student view.
In Module 1 your robot did exactly what it was told: drive 20 cm, turn 90°, repeat. It never found out where it actually was. Nudge it, or put it on a slippery floor, and it carries on with the plan anyway and ends up somewhere else.
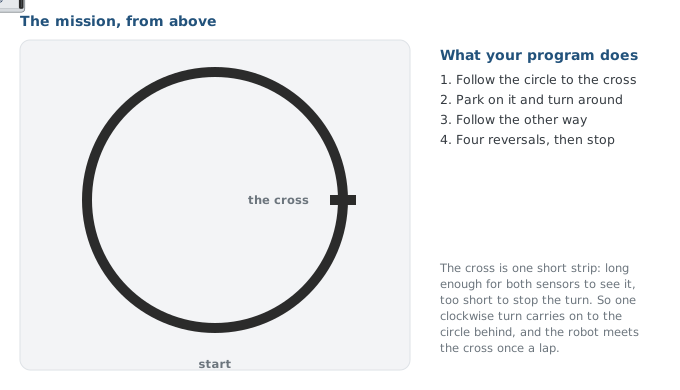
This module changes that. By the end of it, your robot will follow a taped circle on its own, find a short strip of tape across the line, turn around there, and do it again, four times, then stop. Nobody tells it how far to drive or how long to turn. Every stop and every turn ends because the robot saw something.
Learning Objectives
By the end of this overview you will be able to:
- Describe what the robot will do by the end of Module 2
- Explain the difference between a move that ends after a set distance and a move that ends when a sensor sees something
- Name the one program file you'll start in Lesson 2-1 and keep for the rest of the course
- Say what each lesson in the module adds to the robot
Sense, think, act
In Lesson 1-0 you decided that a robot has to do three things: sense the world, think about what it sensed, and act. In Module 1 your XRP mostly acted. It drove, turned and drew shapes, but it never sensed anything, so every decision was yours, made in advance.
Module 2 adds the first sense. At the front of the XRP, facing the floor, are two small reflectance sensors that tell a white floor from a strip of black tape. Every program in this module is built on one question the robot asks over and over, many times a second: what do my sensors see right now, and what should I do about it?
Told in advance
Drive 20 cm, then turn 90°. The robot finishes the move whatever happens, and only finds out it was wrong when you look at the floor.
Ended by a sensor
Drive until the sensors see the tape. The move ends where the tape is, wherever that turns out to be.
That second card is the rule for the rest of the course: the robot stops on something it senses, not on a clock or a distance. It's why the same program still works when the batteries are low or the floor is different.
Your Module 1 program drives 50 cm to reach a line of tape. Someone moves the tape 10 cm further away. What happens, and what would a Module 2 program do instead?
One file, all year
Up to now every lesson started a new program. From Lesson 2-1 on you keep one
file, robot.py, and every lesson adds a little to it. Module 2 builds its first two
sections:
LINE SENSOR
Small functions that read the tape: what each sensor sees, and whether the robot is on the line or at a cross.
LINE TRACKING
Functions that drive on the tape: follow the line to the next cross, park on it, turn onto the next line. They use the first section and never read the hardware themselves.
Those two sections drive your robot for the rest of the course. In Module 3 they drive it around a grid, and in Modules 4 and 5 they drive the routes your robot plans for itself. You write them once, carefully, and test each function before you build on it.
Your roadmap
Each lesson teaches the robot one new thing it can do with what it senses:
| Lesson | What the robot learns to do |
|---|---|
| 2-1 · The Reflectance Sensor | Read its two sensors, and tell the tape from the floor. robot.py is born. |
| 2-2 · Drive to the Edge | Drive forward and stop the moment it reaches the line. |
| 2-3 · Bounce Driving | Keep going: turn back every time it meets the line, like a ball in a box. |
| 2-4 · Random Turns | Turn a different amount each bounce, so it explores instead of repeating itself. |
| 2-5 · Proportional Control | Actually follow the line, steering a little all the time instead of bouncing. |
| 2-6 · Two-Sensor Following | Follow the center of the line with both sensors, more smoothly. |
| 2-7 · Sensor Toolkit | Finish the LINE SENSOR section, and test the whole thing by hand. |
| 2-8 · Intersections | Notice a cross in the tape, and stop there. |
| 2-9 · Line-Tracking Functions | Park on the cross and turn onto the next line, ended by the sensors every time. |
| 2-10 · Final Project | Put it together: lap the circle, reversing at the cross, four times. |
The final project needs almost no new code. By then it is a short list of calls to functions you wrote and tested earlier, which is the payoff of building the file one tested piece at a time. (If you take on the optional class extensions in Lessons 2-7 and 2-9, the same project runs on your objects instead.)
Wrap-up
- What will the robot do by the end of the module? (Follow the circle, reverse at the cross four times, and stop.)
- What ends each move in this module? (Something the sensors see, never a distance or a timer.)
- What is
robot.py, and what are its first two sections? (The one file you keep all year; LINE SENSOR reads the tape, LINE TRACKING drives on it.)